The Great Gluten Free Bread Machine Experiment - Part 1
 |
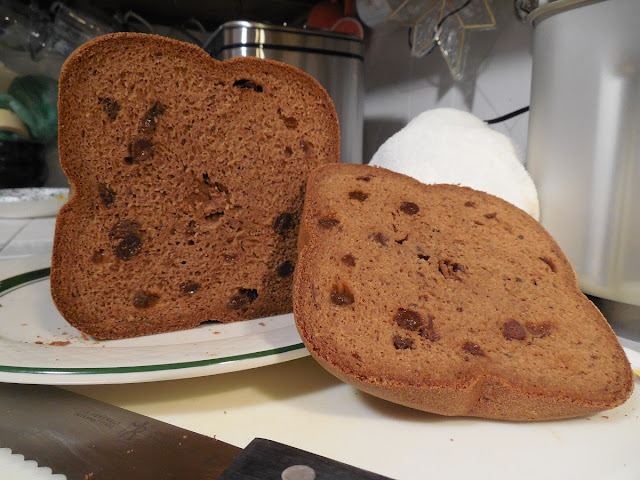
| Results of Experiment 1 with bread machine. |
I got a Cuisinart bread machine! What I made first, how it turned out, what I learned.. coming up! We all bemoan the high price of bread. Even someone like me, who stays ketogenic most of the time. Bread is just useful. I'm interested in all the ways people bake bread, especially today with Paleo breads, allergen friendly breads, grain free breads, etc. Bread is soothing and a big part of our culture, so even if you have to have a strange type of bread or if you can only have a 1/4 piece, it's always important.
Before I was Celiac I dabbled in bread baking. I loved to make Rye breads especially and rosemary multigrain breads. But those were gluten breads. To transfer those skills to gluten free takes a lot of work. I also don't like to follow rules without knowing why. So I don't consider this "baking" yet. It's an experiment. Someday I'll feel like it's baking when it becomes routine. I encourage you to do the same. Don't worry if it doesn't turn out right the first time.
I took a class from the brilliant Meg Mason in GF sourdough bread making (I highly recommend her class btw!) but I couldn't reproduce the results at home. It's not her teaching, she kindly helped me out by email. It's me. I did get the starter going, but there's a transfer point from starter to large "feeding" when you make the loaf. That transfer point proved too tricky for me. But I didn't give up. Neither should you. Healthy homemade bread is a blessing everyone can enjoy.
I used to be one of those snobs who were like, "why would I use a machine to make bread?" Well now I'm eating crow because the bread machine is saving me a lot of painful standing in the kitchen. It reduces the workload and helps me produce something I can really enjoy that I wouldn't be ready to do on my own, certainly not on a weekly or twice a week basis.
Another good reason for a bread machine is that you get to watch the process and learn from it. I'm writing this while the second experiment is baking and I've learned that a high protein gluten free dough can shrink after the oven spring has already happened. More about that next time. If I didn't have a bread machine, I would've never had a chance to see that in action.
Having read a lot of blog articles lately on bread machines, I suspect that some people buy them, do a recipe or two, decide it's too restrictive and give up on it. This probably happens about the time they read an article that says "put your dough into a pan and oven bake it" and that runs into problems because the oven is not as controlled an environment for baking as the bread machine.
I suspect they blame themselves for the imperfect results. Which is not so good because then nobody learns anything. I'm experimenting to see how flexible my use of the bread machine can be. I can't do the vigorous work, but I can try to find recipes that are less hands on if possible. Along the way I will expose every failure and success so you can learn while I learn.
Don't put "additives" into the bread until the machine tells you to.
I added the raisins when I added the flour. That was a mistake. They came out partly mushed and I think it interfered with the mixing (next issue).
You'll probably need to mix more than you expected.
In this experiment I had a very hard time getting the ingredients to mix together. I tried the Gluten Free Setting and it was just lumpy dry bits of flour before baking would've started. So I stopped it, mixed it up some more with a spatula and started the Sweet Bread Cycle.
I let it mix on that, but when it came to the final rise, it looked like it would get less than a one hour rise. I didn't think that was smart. So I turned the machine off after the mixing was done and set a timer to remind me in one hour to check the dough. THEN I used the plain old bake cycle.
One annoying thing about this machine is that while every other setting has a light/medium/dark crust setting. The bake cycle has no such fine control. I'm worried that may be a limitation later, but for this experiment it wasn't a problem.
The mixing cycle in some machines may need more help than others. This video shows you why.
Note that this isn't gluten free bread, don't expect your GF dough to form a pretty ball like this video. An evenly mixed gooey mass is about right for a GF dough. I've seen videos with a batter like dough which bakes up perfect too.
Another video confirms her findings above, that most people just help the mixing process and don't think anything of it. So keep that in mind. People who already know, may not think a step is important, but beginners may be confused. Some machines just need more help than others, especially my Cuisinart.
Make absolutely sure your flour is fresh and doesn't smell or taste "rancid."
Rancid is a bitter sharp flavor that you can't bake out of bread. I used a bit of old GF all purpose flour in this recipe and I regretted it. I was like, "What's odd about this?" I sniffed the flour later and realized it had already gone off. It was too old to use. Always be sure the flour you use is fresh. I even mixed a bit of flour with water and tasted it to be sure it's neutral before baking a second time.
Consider grinding your own flour. It's really not as hard as it sounds. Even a decent sized coffee grinder can help with that. If you don't mind grinding about 1/2- 3/4 cup at a time.
Be careful with flavorings.
This wasn't a big issue, but the cinnamon flavor of this batch was too much. I know many bakers say "you can never have too much cinnamon" but in bread... yeah, you can. I used 4 tablespoons and wow, powerful! I remember this same effect with rosemary. You can overdo that too. Better to start conservative and up the flavorings next time.
It's best to use an instant read thermometer at the end than guess.
With a square pan like mine it's less important, but it's a good idea to check that the temperature of the bread is around 201-5 degrees F before you turn off the "Keep Warm" cycle. If it's almost there, you can just leave it in Keep Warm and check again in a few minutes. If it's far from it, use the bake cycle and check every 15 min. Reasons to do this vary. For one thing, you don't want a gooey mess in the center of your loaf. For another reason, if you want to be sure the yeast have not survived, then this is essential.
Manuals are inadequate.
You will probably watch a lot of youtube videos to help you because instructions just want to emphasize how easy it is without helping you understand the machine. Eventually you'll gather guidelines which will help you. The online community can really save you time when you're learning. Here's a sampling:"Don't use the GF setting" Heh
"Use 1 cup starch flour at least" Usually tapioca or rice.
"Double check you have the paddle in before you add water/flour"
"When you find something that works, stick with it"
"Eggs are optional"
"Dairy milk makes it fluffier, almond milk makes it denser"
There are many other insights from these videos. Such as, most people use a mix of some kind, and about 3 cups of flour and two cups of liquid. And nobody uses butter in these recipes. For good reason, oil absorbs into gluten free flour more easily. For some reason the manual told me to use butter. Which told me they hadn't actually tested the recipes very well.
I use Namaste Flour too, but I use the Organic one, it's certainly more expensive than the one she's using in the third video. I'm glad to hear there's an affordable version of it out there. It contains a small amount of xanthan gum and plenty of starches. It's marketed as a substitute for biscuit mix. And it works very well for that. It's my go-to for random baking needs. It makes a great pizza shell also.
What follows is the recipe I used today, with modifications based on what I learned. Granted, I have to guess at the Cycle and the crust because I had so much trouble at first. So consider this an experimental recipe, if you try it.
I also didn't just put the yeast on top. I wanted the yeast to be awake and ready by the time the mixing was complete.
Gluten Free Cinnamon Raisin Bread Machine Experiment
Machine: Cuisinart CBK-110 (or whatever you have)
Cycle: Whole Wheat (help the machine mix)
Size: 2 pounds (lbs)
Crust: Medium
1 1/2 cup lukewarm water + 1/2 cup held in reserve if it's too dry
1 packet of yeast (about 2 and 1/4 teaspoons)
3 Tbsp Turbinado sugar
4 Tbsp oil ( I used sesame oil)
3 lg eggs
1 1/2 tsp salt
3 cups Namaste Flour (In this version I used only the flour mix)
3 Tbsp psyllium husk powder
1 Tbsp cinnamon powder
1 cup raisins, wet them, and allow them to stand until the "Add Ins" beep is heard.
Steps:
I combined the sugar and warm water, then added the yeast to wake it up. You can do it the standard way and put the yeast on top, I'm not sure if it makes a difference.
I combined all the wet ingredients in one bowl, all the dry ingredients in another.
I loaded the machine wet on the bottom, flour on top.
Select the cycle and options.
When you hear it mixing, check on it after a while, to be sure the corners don't have clumps of flour and help the machine mix if needed.
Somewhere between mixing 1 and mixing 2 there will be a beep and "Add Ins" will show on the screen. Add your raisins. Keep an eye on it to make sure it's getting mixed in.
Alternatively, you could take the dough out and roll it out a bit, then roll the raisins into the dough, replace the dough in the machine, and leave the machine to do the rest.
By the second rise / end of the second mixing, it should look either like a gooey blob or like pancake mix. Rarely, you can get a recipe that looks a bit like a ball. But it's not common with gluten free.
Before the bake cycle starts, sometime during "Rise 2" showing on the screen, take out the paddle so it's not stuck in your loaf.
Check during the second rise to be sure it had enough time to rise. It should be at least as tall as the edge of the pan when baking starts, leaving room for the oven spring effect to make it taller.
When finished, check the temperature and adjust timing if needed.
Enjoy!
This is my first batch in a bread machine ever. It turned out better than I expected but it required a lot of fussing. And I made two mistakes. I've given you all the insider secrets I have so far. I wanted a square pan not an oblong one because of the heating. I didn't want to worry about the center of my bread being not quite done, or dry corners, so a more cylinder like bread was my goal.
The result looks like a little football of bread. You slice this sort of bread while it's "lying on its side" and you get a huge slice. For sandwiches, I recommend cutting one slice, and then cutting the slice in two (straight or diagonally) instead of making a HUGE sandwich. Well unless you like them enormous!
Bread Machine Baking Series
PDF Printout Recipe for 2 Lb Rice/Buckwheat Sandwich Bread https://nixgluten.blogspot.com/2020/10/rice-and-buckwheat-bread-recipe-gluten.html
Part 1 Raisin Bread https://nixgluten.blogspot.com/2019/10/the-great-gluten-free-bread-machine.html
Part 2 Airy Fluffy Gluten Free Bread https://nixgluten.blogspot.com/2019/10/the-great-gluten-free-bread-machine_29.html
Part 3 (Failed, lessons learned) Cinnamon Raisin Bread https://nixgluten.blogspot.com/2019/10/the-great-gluten-free-bread-machine_31.html
Part 4 High Fiber Bread https://nixgluten.blogspot.com/2019/11/the-great-gluten-free-bread-machine.html
Part 5 Stand Mixer Sandwich Bread https://nixgluten.blogspot.com/2019/11/substantial-sandwich-bread-recipe-part-5.html
Part 6 Oat Cinnamon Raisin Bread https://nixgluten.blogspot.com/2019/11/the-great-gluten-free-bread-machine_10.html
Part 7 Largest Loaf 3 Lb Machine bread https://nixgluten.blogspot.com/2019/11/the-great-gluten-free-bread-machine_12.html
Final Recipe Rice Buckwheat Bread https://nixgluten.blogspot.com/2020/02/gluten-free-whole-grain-rice-buckwheat.html
Bread Mix, Bob's Red Mill https://nixgluten.blogspot.com/2021/05/product-review-bobs-red-mill-homemade.html


