Gluten Free Whole Grain Rice Buckwheat Bread Recipe for Bread Machines
 |
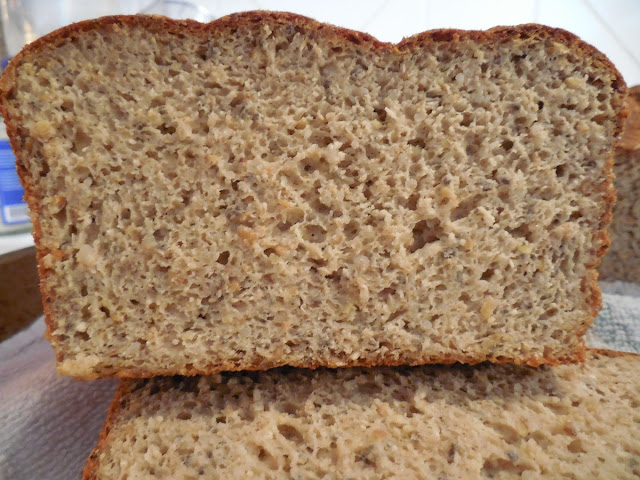
| I'm so thankful for these results. It didn't even sag in the middle. |
Ahhh the bread baking series returns! New thrills and new spills await us! I did a great deal of book reading over the holidays about bread baking and I'll share some insights from that. As a result, I decided to try a very simple recipe for bread in the bread machine, just rice and buckwheat, no other grains. However it does have what is called a "soaker" of chia seeds. More about that later. The results are like a hearty whole grain bread that toasts nicely. It's sturdy, it can be made into grilled cheese without crumbling into dust. It stales slowly, and it contains no eggs! It contains milk though. All the ingredients except a couple are as whole foods as you can go. There is no purified starch in this bread at all.
This is the Great Gluten Free Bread Machine Experiment - Part 8! See the beginning of the series here. The purpose of the series is to identify some recipes which work in a bread machine for gluten free eaters who can't commit to baking bread the usual way due to advanced age or mobility issues. Kneading bread or bending down to fill/empty an oven is not for everyone. This is for you if you have trouble with movement. Meanwhile I'm sticking to whole foods whenever I can so the results can be as nutritious as possible.
To do it exactly like I did, you'd need the exact bread machine I'm using, and a Vitamix with a dry grains grinding container. Feel free to skip the Vitamix part and use preground flour. I like the extra safety of grinding my own, but don't feel obligated. People make many claims about fresh ground flour. I think it makes more difference if you're fermenting it into sourdough, but we're not. So just grab your bread machine and let's bake!
 |
| Don't forget the salt, I almost did! |
If you grind your own flours..
Grinding the flour is a bit tricky with rice. You will never get it as fine as you can get it from a store. Don't try, or you'll over heat the machine. The good news is, buckwheat grinds to a fine powder very quickly (15-20 sec!). What I do for rice is, first I don't put more than 500g of rice in there at a time (roughly two and a half cups), this recipe calls for 400g. And second, I stop after 30 sec, lift the canister off the base and give a shake, then carefully feel the bottom half of the plastic container (do not touch the bottom of the canister, it might be hot enough to burn you, just the bottom half of the clear plastic container). If it's warm, set it in the fridge for 2-10 min. If it's only barely warm or not warm at all, grind again for no longer than 15-20 sec and check again. Repeat until you have rice flour that is acceptably fine. The total grinding time should be around 1 minute.
The first time I made this formula of bread, I reached in when it was time to remove the paddles from the bread machine, and I was scared by the gritty texture of the dough. However, after baking, there was no gritty texture left. Rice flour is known to be gritty when it's baked without sufficient soaking time. Luckily, in this case, it's been ground fairly finely, and then soaked for at least 2 hours before baking. It's going to be OK. Technically I"m not sure if the heating from my Vitamix has any effect on the flour quality. It might be a good or bad effect. The end result works though, so I'm not going to over-worry at this point.
I used Volcano Rice the first time (pictured), Lundberg the second time. The results were similar. Since the volcano package is just over 400g, I used the whole thing and adjusted the buckwheat to slightly less. It still worked.
Reasons to avoid pure starches
I didn't want to use pure starches in my breads. I think it's unnatural. I work so hard to keep processed foods at bay, that it makes little sense to reach for starch when making bread. Bread is supposed to be a nutritious food, partially broken down by yeast and/or good bacteria. It's a fermented food. What I've read recently in Gluten Free Food Science and Technology (pub 2009), convinced me that we're taking home baking advice from industrial food manufacturers when we're using purified and even modified starch to bake gluten free bread at home.I don't think that's a good idea. Our ancestors didn't have high gluten bread flour (wheat) to make bread with. Yet they made bread. And not always with wheat or rye or barley. I say, let the food manufacturers do as they wish, but let us figure out the best way to nourish ourselves at home. So, for the reasons...
1. Pure starches are pure sugar. A starch is a long chain of sugars linked together. A pure starch is as much junk food as pure sugar is. No other nutrients are found in pure starch other than calories.
2. Pure starches are very high Glycemic Index, and people with Celiac have a better than average chance of developing Diabetes.
3. I don't understand the process used to "modify" many starches used to leaven gluten free foods. Do you? Why is it so hard to get a step by step diagram with a listing of any chemicals used (if they are)? It makes me suspect that they are afraid we'll reject the food if we knew. But the lack of transparency is already making me reject it.
I'm not taking aim at only tapioca "flour" but also potato starch often used in gluten free baking. If you like the taste of tapioca, or it's a tradition in your family, it's OK, there's cassava flour available from the very same plant. Just less processed. There is an explanation of the difference between cassava flour and tapioca starch here. Archived here.
Whole Ingredients are More Satisfying and Tasty
Rice excels at pulling minerals out of the soil. For better or worse, rice is one of the whole foods with the highest amount of minerals you can eat. But only if it's a whole grain. If you use white rice, you may avoid the arsenic that sometimes contaminates rice. But you will also lose the other nutritious minerals. It's a gamble, and a matter of personal choice. Green leafy vegetables are good for minerals too, but they won't fill the void if what you're missing is real bread. Not only will the bread taste better because the whole grain is used, but the nutrition quality will help you feel more satisfied. If you're eating grains and breads anyway, make them the best they can be. |
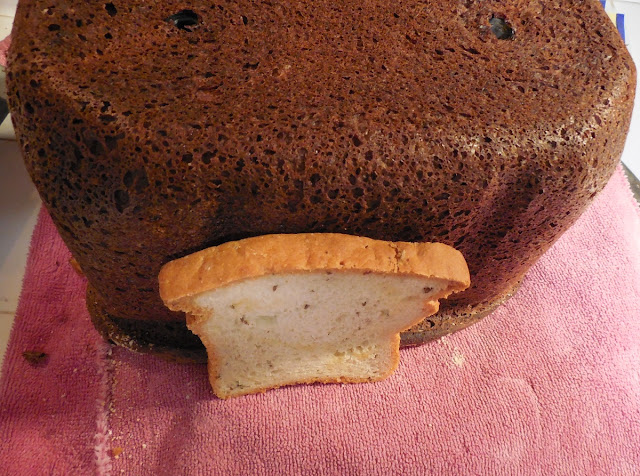
| Hmm, maybe it can rise higher, but the result was still good. |
The only ingredients in this that aren't whole foods are the yeast, the sugar for the yeast, the little bit of oil, and a bit of guar gum. Let's talk ingredients...
Guar Gum
In keeping with the theme of this series, which is to seek an "easy mode" bread recipe anyone can throw into the bread machine and get good results, I've decided the lesser of two evils is to use a bit of gum instead of using many ingredients (psyllium, chia and flax) to replace the gum. The usual gum used is xanthan gum, but it bothers my stomach. And I've heard other people with Celiac say that it bothers them too. I know that guar gum is from the guar bean, but again there's a bit of a problem with knowing exactly how it's made or purified.
Luckily, I only need 1% of the total flour to be guar gum. If I were using tapioca starch then 30% or more of the flour would be tapioca.Tapioca starch is sometimes viewed as the starch that becomes gelatinized and then holds on to gasses in the absence of gluten. This recipe is designed to show that it's not necessary to use a purified starch to do that. I think the body can deal with a 1% amount of a hydrocolloid like guar gum better than if 30% of the flour were made up of pure starch.
I didn't want to use the multiple additives in this new recipe, like in the previous recipes, because I think it's a bit fussy and expensive. It wasn't a bad way to make bread, and the additives are acceptably "whole foods." But I was hoping to find a bit more simplicity with a new recipe. I already know I like the taste of buckwheat, and rice is very familiar to many people. Why not limit my grains to two grains (one starchy, one with higher protein) and build a recipe around that? That's just what I did. I built it around a 600g total flour recipe, which is a bit small for my bread machine but fits most other bread machines too.
 |
| It doesn't smear the knife when you cut it. |
Reminder: Baker's percentages are used in my recipes now. So if I have a 600g total flour recipe, then 1% is 6g. Taking the example of guar gum, that means I have 600g of flour (partly rice, partly buckwheat), and 6g of guar gum mixed into it. I don't have 594g flour and 6g of guar. If you're following my recipe, get out the scale and set it for grams. You should be able to fit this into a 2 lb bread machine. The beauty of using grams is, if you need to recalculate for a smaller machine, you just change the flour, and recalculate based on the % flour. So if you wanted 500g flour, you'd use 5g guar gum. See? Easy. There's a lot more about baker's percentage and links to even more here.
The choice of rice in the bread is controversial in some circles, namely Paleo or Primal. The reason I chose it is for the high amylose content so that the starch would firm up after baking like a normal wheat bread does. When seeking substitutes for rice, in this case you're looking for something with low amylopectin content, high amylose. I may test a more Paleo friendly version, but the guar gum would also be against the grain there. So to speak.
Milk, no eggs, low added fat
I also thought I should come up with a recipe that excludes eggs since some people have that as an allergy. Many recipes for Celiacs call for milk powder in bread. However, I cut out the middle man and just used whole milk as the liquid. Seems to work great.Adding milk also reduced the amount of fat I need to add. I haven't tested the recipe without the oil, but if you're feeling brave, and you prefer a drier bread, try it and let me know how it works out. It's not so much that I'm worried about too much fat in my food, it's more that fat changes the texture of bread, so the less added oil, the more bread-like, and less cake-like, the results.
If your favorite Celiac family member has both an egg and a milk allergy then I suggest you try using full fat organic soy milk to replace the milk in this recipe. Other non dairy milks aren't going to work as well as soy because soy protein can form structures similar to gluten (though it's safe for Celiacs).
Long Grain Rice and Buckwheat
I also chose long grain rice. Now that's a big deal, because you could use short grain if you want a softer bread. I wanted something a bit stiffer, so I went for long grain in this recipe. The recipe shows the brands I used in places. Many of the items I used are certified Gluten Free now (such as the Lundberg rice), but Amazon's pictures doesn't show it yet. Always double check when you can to ensure you're buying something safe for you.Now about the dry grinding of flour. I did that because I think it's the most familiar and usual for people around here. However, there's another way to use whole grains, and that's wet grinding. With Wet grinding you can use your blender as normal, as long as you soak the grain sufficiently beforehand. Some blenders may still lack the power to fully smash hard grains like rice. But if that's all you have, then by all means use this method. Here's a tutorial by the brilliant Swetha on her blog. Water content and %hydration will become a bit iffy when you do this, but with practice you'll work out the best way to do it.
Chia Seeds
Technically a soaker is meant to soften and condition the dough, and add flavor. Chia does all that very well. I also just like it. I think at this point, I'd miss it if it wasn't in my bread. From a nutrition standpoint, it provides more than just fiber and helps the dough to be thicker. To me this is a win-win, but if you want to skip it, go ahead. You can replace its effect with some nut butter if you want and you're not allergic to that. But you might want to warm it up so it flows easy and mixes in, the recipe will be more fussy. Other good soakers might be psyllium husks or ground flax seeds. Depends what you have and what you like.And now for the best part: this recipe really is hands off and set it and forget it, just like the bread machine manufacturers claim! I wouldn't have believed it if I hadn't seen it with my own eyes. The batter/dough comes together like magic and rises normally.
Here's a video of the consistency:
It's not even bothered by being punched down repeatedly in the Whole Wheat Cycle. I must've gotten lucky again with this new recipe, because it's like a dream. If you want an "easy mode" bread machine recipe, this is the one to start with.

Rice and Buckwheat Bread with Chia Seeds
A great tasting gluten free bread, equally good with stew or as french toast.Allergens: Contains Milk
Equipment:
West Bend 1-3 lb Hi Rise Bread machine -- Whole Wheat Cycle 2.5 lbs, Dark Crust
Vitamix 5200 with Dry grind attachment
Baker's percentages and grams are used. Excluding soaker, 100% hydration.
Soaker: 30g chia seeds + 70g water (set aside for 5-10 min to thicken)
400g rice flour (I fresh ground mine, this is a good one)
200g buckwheat flour (I fresh ground it, this is a good one)
600g whole milk (100%)
15g vinegar (2.5%)
15g oil (2.5%)
15g turbinado sugar (2.5%)
1 packet Rapid Rise yeast (or Bread Machine yeast, or Instant Yeast, these are the same)
*that's 7g in a packet or around 1% also
6g guar gum (1%) with the chia also, you don't need much of this
6g salt
Combine, flours, guar gum, and salt in a bowl and set aside.
In the Bread machine container, add milk, sugar and soaker.
On top of the milk mixture, put the flours mixture. Don't stir. Make a hole or channel in the top, and put the yeast there.
Along the side, slide in the oil and vinegar, just before starting the machine. That is to say, set the settings for the machine, pour in the oil/vinegar, and press Start. Since we're using milk and vinegar, I'd rather not take a chance at curdling the milk.
My machine takes 3 and 1/2 hours for the whole wheat cycle. Don't open it in the last stage of rising and baking, it can collapse, otherwise, feel free to scrape the sides down in earlier stages if you feel it needs it. But it shouldn't need that. This dough works pretty well, hands off.
Important Note: Using a thermometer I've noticed that the bread in a bread machine doesn't always get to fully cooked temperatures. This is even more important when you're baking gluten free. So either use a thermometer that can monitor the temperature and beep when it's at 210 degrees F in the center of the loaf, or do what I do.... leave it on Keep Warm after it's finished for another 45-60 minutes, then cool on the countertop for another 2-12 hours. All this is before slicing. It will be worth the wait.
It needs to be "toasted twice" if you want to see color change. It should be toasted once if you just want to soften it up a bit. Long grain rice produces a stiff bread, if you like your bread softer, use short grain brown rice.
I did a rough guesstimate of the cost per loaf for this bread and it's around $5/loaf if you're buying small size bags of rice and buckwheat. The guar gum is a one time cost that's good until the 'use by' date passes. The milk is also a significant expense and it may be more economical to use milk powder. However, with this recipe you got a bread that definitely wasn't processed with enzymes, except those that exist in the whole foods you added and perhaps in the vinegar and yeast. There's no gum in there but what you added. You control the number and quality of each ingredient.
Please let me know how it turns out for you!
Bread Machine Baking Series
PDF Printout Recipe for 2 Lb Rice/Buckwheat Sandwich Bread https://nixgluten.blogspot.com/2020/10/rice-and-buckwheat-bread-recipe-gluten.html
Part 1 Raisin Bread https://nixgluten.blogspot.com/2019/10/the-great-gluten-free-bread-machine.html
Part 2 Airy Fluffy Gluten Free Bread https://nixgluten.blogspot.com/2019/10/the-great-gluten-free-bread-machine_29.html
Part 3 (Failed, lessons learned) Cinnamon Raisin Bread https://nixgluten.blogspot.com/2019/10/the-great-gluten-free-bread-machine_31.html
Part 4 High Fiber Bread https://nixgluten.blogspot.com/2019/11/the-great-gluten-free-bread-machine.html
Part 5 Stand Mixer Sandwich Bread https://nixgluten.blogspot.com/2019/11/substantial-sandwich-bread-recipe-part-5.html
Part 6 Oat Cinnamon Raisin Bread https://nixgluten.blogspot.com/2019/11/the-great-gluten-free-bread-machine_10.html
Part 7 Largest Loaf 3 Lb Machine bread https://nixgluten.blogspot.com/2019/11/the-great-gluten-free-bread-machine_12.html
Final Recipe Rice Buckwheat Bread https://nixgluten.blogspot.com/2020/02/gluten-free-whole-grain-rice-buckwheat.html
Bread Mix, Bob's Red Mill https://nixgluten.blogspot.com/2021/05/product-review-bobs-red-mill-homemade.html