Substantial Sandwich Bread Recipe Part 5
 |
| A substantial sandwich bread, gluten free! |
Taking a tiny break from bread machine recipes to present a Stand-Mixer bread recipe today. I also want to talk about Amylose and what vinegar has to do with gluten free bread. In the previous articles in this series, I discovered that mixing is a big problem for most bread machines. That ends today with a Stand Mixer. I will go back to a bread machine soon, for all the reasons I've already listed, but let's explore the mixer option a bit first.
Today the Kitchen Aid is the standard in baking mixer machines, but I decided to go with a budget model instead since it got rave reviews just last year. Few bells and whistles, but an excellent mixer.
Since gluten free recipes use flours that absorb water more slowly and they have to form a gel "hydrocolloid", not gluten, usually this means bread machine recipes call for more water than you might expect. As a result, the bread's structure may suffer, and there is a rush to bake the bread during the first rise (there may not be a second rise). Most recipes for gluten free bread in a bread machine use the formula of "only one rise." But that leaves too much hard to digest starch for me. I've always preferred bread to be properly fermented.And so the experiments continue.
The Option of a Stand Mixer for Bread Making
Well I put an end to the "didn't mix well" saga by using a machine designed for the task. In keeping with my tell-all on how things work and how user friendly they are... I have to say that there are downsides to the mixer method. However, proper and complete mixing is not one of the issues.
But first...
 At first we tried to revive an old Sunbeam mixer but the hidden gluten in it proved beyond our ability. We would've had to take the entire thing apart with little hope of it working again after we cleaned it. Here are some pics with gluten flour circled in red. That's just the beginning, there is a big enough hole that we were confident the mixer would be full of gluteny flour. If you are strapped for cash and want to use a mixer instead of a bread machine, you could, in theory clean all that flour out, so these pics will help you find where it's hiding.
We managed to pry off the front piece and it was a mess of flour behind it, and probably inside too. If you are working with a Sunbeam, there is a screw holding on the front, at the top, under the handle. We broke it unfortunately, but it did snap back on just fine. This machine is headed for the Goodwill. In case, for financial reasons you have no choice but to clean your old mixer, now you know where to look for hidden gluten flour.
The New Mixer...
My husband and I debated for some time about whether or not to go with the top of the line Artisan Kitchen Aid mixer. However, I found a review of the Farberware mixer and decided that it was worth a look. It's 1/4 of the price of the Kitchen Aid, and that's after a price hike. Apparently it debuted at around $70.If you decide this is the right mixer for you, consider the accessory kit. One of the odd things about this mixer is that you absolutely can't get a second dough hook at all. If it breaks, the entire machine is junked. So go easy, use low speeds and make it last. The accessory kit, you might be thinking, when will I ever use this? But if you like nut flours and you don't mind them being a bit coarse, you can use the "slicer/shredder" attachment to "grind" oily nuts like walnuts into a coarse flour for use in baking.
That attachment won't make "nut butter" out of nuts. It's just right. I used something like that while I was growing up, to "grind" walnuts with a shredder. You can save a bunch of money by grinding your own nuts. Since this is a bit of a budget item, the accessory kit will probably disappear, never to be found again. And there seems to be no hope of replacement parts.
 |
| The model # |
Downside to the Mixer Method...
So why don't I just switch to using a mixer and forget the whole bread machine idea? Well these are the additional steps I had to do in order to make bread with a mixer only:- Prep the pans, which doesn't sound bad until you think about that the pans are often in the lower part of people's cupboards. That means bending down and I'm not always good at that. My bending down ability comes and goes.
- Load and unload the oven, again bending, plus lifting.
- Prep the oven for rising, more bending, lifting.
- This particular model of mixer has no parts I can buy, so a second bowl is not available to buy, therefore the parts have to be at least rinsed immediately after use, and if you need the bowl again, you have to transfer things between bowls.
- More cleanup, even if you rinsed, there are more parts to clean with a mixer than a bread machine.
The Vinegar-Yeast Connection
Many bakers have noted that adding vinegar to gluten or gluten free bread doughs encourages the yeast. Usually they're at a loss to explain how.I think I have part of the answer: acid hydrolysis of amylose. First, what is that? Amylose is one of the two types of starch (technical definition) that plants produce, it has a long chain of glucose sugar molecules. Acid hydrolysis is a fancy phrase for "acid breaks down the long chains into shorter ones." It turns out, into less than 6-glucose long chains. That's pretty short...
This is important because yeast can't eat starch, but we know they can break down short chains of starch with an enzyme called maltase. Actually there is debate about whether it's the yeast breaking it down, or lactic acid bacteria, but I can't settle that debate so I assume that results speak for themselves. Maltase is an enzyme which breaks down the sugar maltose. Maltose has two glucose molecules, not six. And Maltase can't break down other things.
So it seems we're at an impasse. Except, the study mentions that they can't detect how small the broken down bits of starch are. All we really know is, they're below 6-glucose chains.
The last loaf I baked had a multigrain texture and was high fiber. It had a pleasant structure but I think I can do better, I honestly thought it had not risen as much as it could. I decided I didn't add enough sugar and the yeast "gave up" before we were done. Or maybe the eggs chilled the yeast.
In gluten bread baking there's an answer for that, well two answers. First, make a sourdough which has a community of leavening bacteria and yeast that can work together to break down more starch. And second, to use "diastatic" barley flour, a type of flour that has both some broken down starch, and some enzymes to help break down even more. What a funny word... diastatic. It comes from "diastase" which is an old word for Amylase.
Of course you should never use barley on a gluten free diet! Read on for what to do instead.
When a person sprouts grain and then grinds that into flour, "diastase" is now in the flour. Baking bread has a step, called "autolyse" where you leave part of the flour and most of the water to do their thing, usually for 30 minutes. Gluten free recipes for baked goods often include an autolyse step to keep rice flour from feeling "grainy" in the final product. During autolyse, the enzymes in the grain will break down some of the starch and make it available to the yeast., and the starch molecules have a chance to soften up by absorbing water. It turns out that adding a little (not too much!) vinegar can help with this.
So add these to your bread making toolkit:
1. You can make your own diastatic gluten free flour by sprouting something (maybe quinoa) then grinding it to a paste. Try to use the same grain in your bread too. So if you're sprouting quinoa, then use some quinoa flour. Sometimes these enzymes are finicky.
Technically you could use a plain old digestive enzyme tablet, but I can't even begin to guess how much to use, or whether it changes the flavor. I suggest you resort to the "digestive pill" method only if nothing else is available, or if you have a FODMAP issue and it's the only way you can safely eat bread.This is less unusual than it sounds, Red Star Platinum is NOT gluten free because this yeast contains enzymes from wheat. So there's a commercial producer adding enzymes for bakers.
2. Bake sourdough style, with or without adding yeast to the mix. Don't become a martyr to principle if you can't make a pure sourdough work. The existence of the sourdough starter in the mix will help the yeast already.
Remember we're lucky to live in the same town as an expert on gluten free sourdough bread, and Millefiori Bakery gives workshops.
3. You can help the yeast out a bit with a small amount of acid such as vitamin C or simply apple cider vinegar. I mean, 1-2 teaspoons, that's how small an amount. Don't add more because baking yeast is stressed out by too much acid.
What these tools do is feed the yeast better so when the dough runs out of sugar (from the proofing), they have something to eat. If the yeast have little to eat, the bread doesn't rise. Yeast can break down small two glucose chains. It takes amylase (diastase) to make glucose out of amylose. However, there's a good chance that a weak acid like vinegar can help break down some amylose into pieces small enough for the yeast to eat it. Although there's considerable debate on the role of vinegar in baking.
Baking yeast is not the same as "yeast infection" or Candida yeast. Baking yeast is Saccharomycetes cerviciae, which is also used in making alcohol, and as a food supplement (nutritional yeast, probiotics). Since we bake bread to 200 degrees F, or a bit higher, the yeast in bread is already killed. Bread is not a probiotic, nor will it ever "infect" you. However yeast improves the digestibility of starches in bread, and deactivates "anti-nutrients" as it works. This is even more important in high starch gluten free bread making which sometimes includes bean flours for protein. Yeast raised bread is a fermented food with all the benefits that conveys. Sourdough bread is even better.
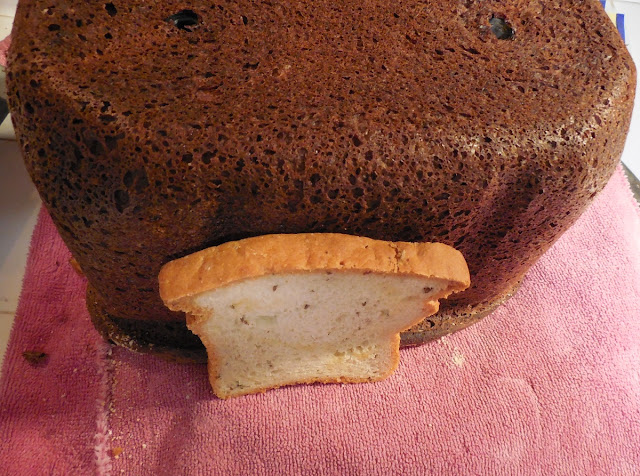
Today's recipe is exactly like the last one, but this time, I added two teaspoons of vinegar, and reduced the coconut flour to 25 grams instead of 50 grams. I regretted that slightly because the "touch of the crumb" was a bit too moist for my liking. In the recipe below, I left it at 50g coconut flour. The "hydration" is 100% and more, yet the dough didn't feel heavy or gummy. I used a different method since I was using a stand mixer, I mixed up all the dry ingredients. I added the liquids, let them mix, then added the flours. Rise for 1 hour. The first rise was spectacular but probably holey. I kneaded with the dough hook and put it in a pan to bake. The crust turned out beautifully dark.
The smell and taste were amazing. If you fill your bread with flavorless starches, and rice flour, you'll get a boring bread. Add tasty seeds and a nut flour and you'll be much happier with the taste. I think rice flour should be in a supporting role, if flavor is a goal.

Substantial Gluten Free "Multigrain" Bread Recipe
Stand Mixer (Experiment 5)
This is turning into a recipe, not an experiment. My husband likes bread that isn't light as a feather, and this really hit the targets of flavor, texture and sandwich usability.My best description of it would be that it's similar to multigrain, but the flavor is deeper and slightly on the sweet side. It also toasts like a champ.Mixer: Farberware 4.7 Qt, 6 Speed (Walmart brand)
Attachments: K paddle and dough hook
2 cups warm water (525 g)
2 Tbsp sugar (35g)
1 yeast packet (I used Fleischman's) (about 8g or 2 and 1/4 tsp dry yeast)
B
3 eggs
2 tsp vinegar (I used Braag Apple Cider Vinegar)
-- add and mix the vinegar in just before you start adding flour
C
2 Tbsp psyllium powder (30g)
1/4 cup chia seeds (50g)
1/3 cup flax seeds *ground (60g)
1 cup Namaste flour (150g)
1/2 cup Almond Flour (50g)
1/2 cup Coconut Flour (50g)
1/2 cup Buckwheat Flour, *ground (100g)
2 tsp salt
Steps
1. Grind anything you need to grind (buckwheat, flax) and warm the eggs by placing them in hot tap water to warm up for 5 minutes. (Chilly eggs from the refrigerator will stop the yeast working.)
2. Combine the flours under "C" above and mix - don't forget the salt.
3. Add warm water, yeast and sugar to the mixer and mix on lowest speed for one minute (K paddle attachment). Allow to stand 1 minute. Check that the yeast is awake, there should be a foamy film on the liquid in the bowl.
4. Add the eggs (I didn't beat the eggs first), turn machine to second setting a bit higher than the lowest setting. When eggs are mixed in, add the bit of vinegar and allow to mix for 10 sec.
5. Begin adding flour one tablespoon at a time, and then you can add faster once it's looking like a batter. Once all the flour is mixed in, and you've scraped the bowl, if there wasn't much or any dry flour, then put the dough in a warm place to rise.
6. I like to put it in a plastic bowl and cover it. Then I put it in an oven that was on for 20 seconds and then turned off.
*meanwhile, clean up, it will be easy to clean now, harder later
7. Rise for 1 hour. (spectacular rise 2 and 1/2 times in size!) I wish it had stayed that way.
8. Preheat oven to 350 F.
 8. Attach the dough hook, "knead" the dough for 2-3 minutes. Meanwhile, prepare a large/full size bread pan by spraying with oil spray and putting parchment paper in the bottom.
* the purpose of kneading in GF bread is to redistribute the yeast and create a more even crumb.
9. Put the dough in sections into the bread pan, wet a hand to avoid having the dough stick to you, and smooth the top. This dough is actually elastic so beware of sliding the parchment paper out of place as you smooth.
10. I had cut the top before the final proof / rise. I didn't realize the dough needed no help. You can wait until just after the second rise to slash the top. Rise 2: 30-40 min, until the dough reaches the edge of the pan.
11. Bake at 350 F for 45 minutes; then at 300 F for 20 minutes.
12. Use an instant read thermometer to confirm the center is at least 205 F. If so, it's done, if not, leave on 300 F and take temperature until the reading is correct.
If the temperature is "too high" that's probably fine. There are plenty of water holding ingredients. Overcooking it is more forgiving than undercooking it.
Allow to stand in the pan on the counter for 20 minutes. Then cool on a rack. Do not slice until 90 minutes have passed, preferably 2-3 hours. It will be worth the wait, promise!
 |
| Toasted twice on low setting. Heaven!
More Mixer Gluten Free Bread recipes from The World of Gluten Free Bread Update: There's more evidence that using a mixer and beating gluten free dough longer produces a lighter fluffier and better dough in this french bread recipe I found later. I haven't tried it, but based on my experiences, I think that recipe is correct. My recipe has more whole grains in it, but I realize that's not everyone's first priority when it comes to gluten free food. Living gluten free is lifelong. |
Bread Machine Baking Series
PDF Printout Recipe for 2 Lb Rice/Buckwheat Sandwich Bread https://nixgluten.blogspot.com/2020/10/rice-and-buckwheat-bread-recipe-gluten.html
Part 1 Raisin Bread https://nixgluten.blogspot.com/2019/10/the-great-gluten-free-bread-machine.html
Part 2 Airy Fluffy Gluten Free Bread https://nixgluten.blogspot.com/2019/10/the-great-gluten-free-bread-machine_29.html
Part 3 (Failed, lessons learned) Cinnamon Raisin Bread https://nixgluten.blogspot.com/2019/10/the-great-gluten-free-bread-machine_31.html
Part 4 High Fiber Bread https://nixgluten.blogspot.com/2019/11/the-great-gluten-free-bread-machine.html
Part 5 Stand Mixer Sandwich Bread https://nixgluten.blogspot.com/2019/11/substantial-sandwich-bread-recipe-part-5.html
Part 6 Oat Cinnamon Raisin Bread https://nixgluten.blogspot.com/2019/11/the-great-gluten-free-bread-machine_10.html
Part 7 Largest Loaf 3 Lb Machine bread https://nixgluten.blogspot.com/2019/11/the-great-gluten-free-bread-machine_12.html
Final Recipe Rice Buckwheat Bread https://nixgluten.blogspot.com/2020/02/gluten-free-whole-grain-rice-buckwheat.html
Bread Mix, Bob's Red Mill https://nixgluten.blogspot.com/2021/05/product-review-bobs-red-mill-homemade.html